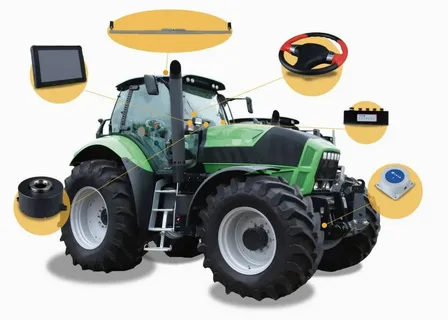
Modern agriculture increasingly relies on technology to improve efficiency and precision. One of the most transformative tools for farmers today is a tractor guidance system. These systems help reduce overlap, save fuel, and enhance overall productivity. In this article, we will guide you through the step-by-step installation of a tractor guidance system to ensure you get the most out of your investment.
What is a Tractor Guidance System?
A tractor guidance system is an advanced GPS-based tool that helps farmers operate tractors with precision. It ensures accurate steering, minimizes human error, and optimizes field coverage. Whether you are planting, spraying, or harvesting, having a reliable guidance system is crucial for modern farming operations.
Tools and Equipment Needed
Before beginning the step-by-step installation of a tractor guidance system, make sure you have the following:
- Tractor guidance kit (controller, GPS receiver, sensors)
- Mounting brackets and hardware
- Wiring harnesses and connectors
- Basic tools (screwdrivers, wrenches, and pliers)
- Instruction manual from the manufacturer
Proper preparation ensures a smooth installation process and reduces the risk of errors.
Step-by-Step Installation of a Tractor Guidance System
Step 1: Mount the GPS Receiver
Start by securely mounting the GPS receiver on the highest point of your tractor. This ensures optimal satellite signal reception. Make sure it is level and stable to prevent signal errors during operation.
Step 2: Install the Display Unit
The display unit should be installed inside the tractor cabin, within easy reach and sight of the operator. Connect the display unit to the power source according to the manufacturer’s instructions.
Step 3: Connect Sensors and Wiring
Attach all sensors to the appropriate locations on the tractor. Use the wiring harness to connect each sensor to the display unit. Double-check all connections to avoid loose or faulty wiring.
Step 4: Calibrate the System
Once everything is connected, power on the system and follow the on-screen calibration steps. Calibration ensures the guidance system provides accurate positioning and steering instructions.
Step 5: Test the System
Before using the system in the field, perform a test drive in an open area. Verify that the guidance system is functioning correctly, the display shows accurate positioning, and the tractor follows the guidance lines properly.
Tips for Optimal Performance
- Keep your GPS receiver clean and unobstructed.
- Regularly update the software for the latest features.
- Perform routine checks on sensors and wiring for wear and tear.
- Train all operators on using the system effectively.
Conclusion
The step-by-step installation of a tractor guidance system may seem complex initially, but with proper preparation and careful execution, it can be done efficiently. A well-installed guidance system improves accuracy, reduces input costs, and enhances overall productivity in modern farming. Investing time in a proper installation ensures long-term benefits and maximizes the performance of your tractor.


